Phased Array UT and TOFD Deliver More Accurate Pipeline Weld Inspections

By Dominic Giguère, Zetec Product Manager – UT Portable Solutions
A pipeline weld inspection is a common nondestructive testing (NDT) application in the oil and gas industry—and also challenging. Joining materials with different metallurgical properties, grain alignments, acoustic characteristics, cylindrical geometries, and other attributes can make flaws hard to detect.
Ultrasonic testing (UT) and the time-of-flight diffraction (TOFD) technique can provide the insight you need to make decisions about uptime, safety, and code compliance while creating a digital record.
If you’re responsible for pipeline maintenance or compliance, or you contract NDT services that perform weld inspections, here’s a primer on what you should know about UT and TOFD.
Basics of UT
Ultrasonic testing or UT encompasses different technologies that use pulses of high-frequency sound energy to detect surface and subsurface defects. These pulses come from a transducer or probe that the technician moves over the surface being tested.
The probe emits ultrasonic waves into the material at precise intervals and a set angle. When a sound wave encounters a defect, some of that energy is reflected back like an echo. The time it takes for that energy to reflect back to the probe is calculated and analyzed by the ultrasound instrument and presented as a graphic on a screen for the technician to review. Having a clean, clear, digital picture on the screen is one of the most important advancements in UT technology.
Standard UT and PAUT
There are two UT methods used in pipeline inspections today: conventional (or standard) UT, and phased array UT.
A conventional UT probe is capable of generating and receiving a single ultrasonic beam. The focal point and angle of the beam are fixed, which can make it more difficult to locate and visualize flaws. The use of a custom-shaped probe can help ensure the accuracy of such inspections.

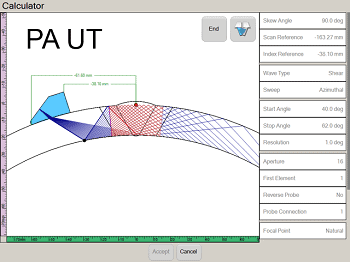
Phased array UT (PAUT) uses multiple individual elements (typically from 16 – 64) in a single probe. By exciting each element in a highly controlled manner, a PAUT instrument can produce a precise beam shape and generate two and three-dimensional views of a flaw with greater speed and accuracy.
First adopted on a wide scale at nuclear power plants, the use of dual 2D matrix array probe assemblies and portable phased array instruments is now common for pipeline inspections. These tools have powerful software that allows technicians to virtually position probes on the specimen to ensure maximum volumetric coverage, and then simulate an inspection step by step.
Time-of-Flight Diffraction

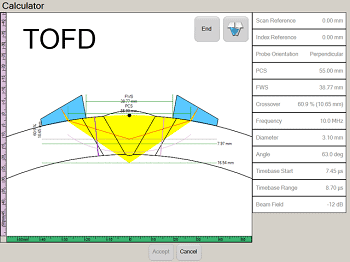
Another advantage to phased array UT is that it allows the use of time-of-flight diffraction (TOFD), a highly reliable technique for flaw detection and sizing in pipeline weld inspections.
In a TOFD system, two ultrasonic probes are situated on opposite sides of a weld. One probe acts a transmitter, emitting an ultrasonic pulse into the material; the other is a receiver. Instead of measuring only for the high amplitude sound waves that reflect off of the back of the component, TOFD calculates the response time of low amplitude waves that are diffracted by the tips of discontinuities.
Because TOFD is highly repeatable, changes in flaws can be recorded and compared over time, creating a valuable history of inspection data. With the right instrument and software, an NDT technician can use PAUT and TOFD to put inspection data into a 3D imaging format with a level of resolution that’s so clear and detailed that it’s easy to recognize flaws without a deep understanding of ultrasonics.
A Useful Combination
In combination, phased array UT and TOFD can detect all welding flaw types and provide reliable through-wall sizing capability in one inspection. The inspector can use a two-sided phased array UT examination with standard shear wave probes to detect planar and surface-breaking flaws, while the TOFD technique can locate embedded flaws and offers accurate through-wall sizing performance.
Using phased array UT and TOFD together can also increase the productivity of the inspection crew simply by reducing the amount of scans and manipulations that need to be done. TOFD can also be used for weld overlays and the heat-affected zones of other components, as well as pressure vessels and storage tanks.
Although materials and welding techniques evolve, fatigue cracks and corrosion will continue to be threats to pipeline reliability. A better understanding of NDT testing and ultrasonics can provide next-level insight into the integrity of your assets, the quality of your inspections, and help you make informed decisions about maintenance and uptime.
Zetec is a global leader in nondestructive testing (NDT) solutions for the critical inspection needs of industries the world counts on every day. To learn more, contact Zetec today!
