Friction Stir Welding Inspection: What to Look Out For
As a relatively newer welding process, friction stir welding has seen an increase in use in offshore, aerospace, automotive, shipbuilding, and other similar applications due to its many advantages. It is a solid-state welding technology that fuses two similar or dissimilar metals using a non-consumable tool. The weld formed with friction stir welding is typically stronger than the typical fusion welding process with a smaller heat-affected zone.
However, the weld achieved can not always be free of flaws and defects, which may potentially make the welded component inoperable. Friction stir welding inspection performed correctly can identify flaws in all orientations, ensuring adequate coverage for high-quality results.
Friction Stir Welding Inspection
The welding mechanism of friction stir welding differs from the conventional welding process in that it does not arc or flame to join two pieces of metal. Instead, the two metal pieces are clamped together while the rotating device is driven along the weld interface. The friction generated between the rotating device and material surface due to high speed creates heat, softening the material.
The softened material from the metal pieces fuses under pressure to create a weld. The weld thus formed has a smaller heat-affected zone with reduced stress and distortion. The welding process embraces high-level automation, and its high speed facilitates the joining of thick metal pieces in a relatively short amount of time.
During the welding process, inaccurate design and weld parameter control can generate defects, including kissing bonds (incomplete bond continuity between materials), cracks, wormholes, and lack of penetration. These defects can be visible on the surface or lie in different orientations within the subsurface, making it difficult to visualize.
Nondestructive testing (NDT) of friction stir welding can help maintain weld quantity with reliable inspection, wider coverage, and improved odds at defect identification. Phased array ultrasonic testing (PAUT) and eddy current array (ECA) both serve as potentially effective NDT solutions.
Solutions for Friction Stir Welding NDT
Traditionally, there has been a need for multiple probes, each individually aligned and calibrated, to address the inspection needs of friction stir weld. The inspection process is generally time-consuming with a standard probe, with less coverage and less reliability in identifying defects in all orientations.
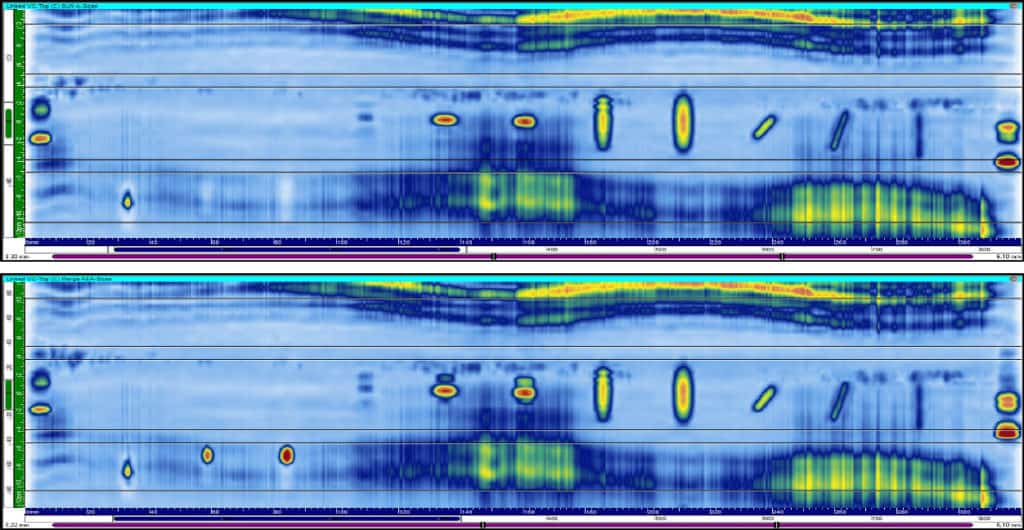
The right phased array ultrasonic testing (PAUT) portable and scalable instruments and approach can make this challenging inspection process faster and easier with their quick setup and calibration ability. Since PAUT uses multiple small transducers, the inspection coverage can be increased. It is recommended that 3 beam angles be used for inspection of parallel flaws in friction stir welding along the weld seam. This is supported by the PAUT, where the individual elements can be pulsed at different times for ultrasonic beam generation. The beam angle can be changed for each pulse, facilitating sectorial scanning for a wide range of angles. For friction stir welding inspection, PAUT enables merging of all scanning sequences along the beam angles +45°SW, 0°LW, and -45°SW, for complete coverage in a single scan.
Zetec’s PAUT instruments such as TOPAZ64 (change hyperlink) and Emeraldcan provide complete features needed for performing friction stir weld inspection. NDT technicians can leverage the following advantages:
- Parallel firing capability
- Improved sensitivity and sizing capability
- 0°LW and 45°SW beam angle generation for flaws that are transverse or parallel to the weld centerline
- Simplified calibration and optimization ability
- 1D linear array and 2D matrix array probing
- Data throughput of up to 30MB/s
Similarly, ECA instruments such as MIZ-21C from Zetec also support inspection through conductive materials like aluminum to identify surface or near-surface flaws. NDT inspectors can utilize features including:
- C-scanning
- Depth sizing
- Multi-layer inspection
With flexible ECA probes, inspectors can perform inspections in harder-to-reach areas and identify minor flaws that may affect the component’s performance.
The simplified scanning process of the weld with PAUT and ECA equipment allows industries to reduce the inspection time while improving reliability significantly.
Improving Efficiency of Friction Stir Welding Inspection with NDT
Compared to conventional eddy current and ultrasonic testing, ECA and PAUT probes can be successful in identifying hidden cracks and pores in the metal. Advanced NDT probes can be optimized to support flaw detection across different orientations. Through reliable capture of weld defects and discontinuities, industries like shipbuilding or aerospace can ensure the quality of their components.
Multi-elemental probes and their excellent repeatability feature can be relied upon for improved coverage, and thus, reduced inspection time. With enhanced friction stir welding inspection systems, industries can minimize the many challenges they face in maintaining the product and manufacturing standard.
Zetec provides a range of exceptional phased array ultrasound testing instruments and probes for friction stir welding inspection to facilitate your need for faster NDT and improved operational efficiency. To find the best NDT solution for your testing needs, contact us today.

